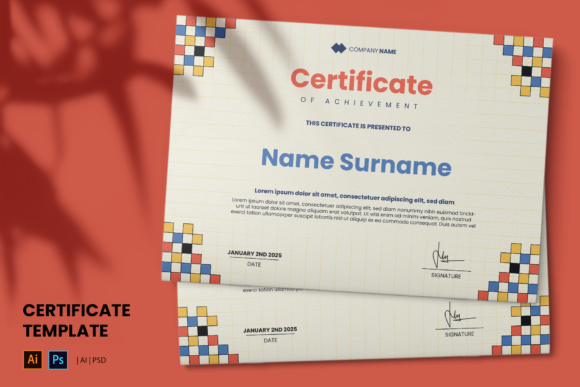
Why Pixel Retro Frame Certificate Templates Deserve a Second Look
If you have ever scrambled to produce a certificate at the last minute for a training session, an employee milestone, or a community award, you already know how quickly the process can go sideways. A design that looks brilliant on screen prints with fuzzy edges. The font you chose refuses to embed. Or the layout that seemed perfectly balanced falls apart once you add the recipient’s name. That is exactly where a well-crafted template makes the difference between a professional result and an embarrassing one. The Pixel Retro Frame Certificate, often paired with a Corporate Modern Certificate Template, offers a versatile foundation that works across multiple use cases. But using it effectively requires understanding what these templates can and cannot do, and steering clear of common pitfalls that trip up even experienced users.
What the Pixel Retro Frame Certificate Actually Offers
At its core, this template combines a distinctive retro pixel-frame border with a clean interior layout that can accommodate course completions, degrees, job certifications, or award recognitions. Because it comes in EPS format at 300 DPI and CMYK color mode, it is ready for professional print production. The file works in Adobe Photoshop, Adobe Illustrator, or any vector software, and it uses only free fonts, so there are no licensing surprises. The page size is A4 (210×297 mm), and the template is fully customizable. These specifications matter because they remove the most common barriers to producing a polished certificate: resolution problems, color shifts, and font mismatches.
Yet the mere presence of good specs does not guarantee a good outcome. Many people download this template expecting it to behave like a drag-and-drop solution, only to discover that vector editing requires a few basic skills. That gap between expectation and reality is where mistakes happen.
Mistake One: Assuming You Can Edit Without Understanding Layers
The most frequent error I see is someone opening the EPS file, seeing a flat-looking image, and trying to add text directly on top of it in a program like Microsoft Word or Canva. That approach almost always leads to alignment problems, text that bleeds outside the frame, and losing the pixel-retro effect because the background gets cropped or distorted.
The Pixel Retro Frame Certificate is a vector file designed for software that supports layers and paths. When you open it in Illustrator or Photoshop, you will find separate layers for the frame, the decorative elements, and the text placeholders. If you treat it like a static image, you bypass all the flexibility that makes the template worthwhile.
Better approach: Open the file in a vector editor and take five minutes to identify each layer. Rename the layers if it helps. Then hide the text placeholders and add your own text using linked or embedded free fonts. This keeps the retro frame intact and ensures your text sits exactly where it should.
Mistake Two: Ignoring the Print-Ready Specifications
The template specifies 300 DPI and CMYK color mode. I have watched people convert it to RGB for on-screen previews and then wonder why the printed version looks washed out or muddy. RGB screens display brighter colors than CMYK ink can reproduce, especially in the reds and blues common in retro-pixel designs. The result is a certificate that looks vibrant on your monitor but disappoints on paper.
Another overlooked detail is the A4 page size. If your printer expects letter-size paper and you do not adjust the scaling, the frame may shift or get clipped. Some print shops also require a bleed area. The template itself may not include a bleed, so you need to extend any background or border elements slightly beyond the A4 edge if your printer requests it.
Better approach: Before you make any edits, confirm your output method. If you are printing at home on letter-size paper, create a new document at those dimensions and import the EPS, then adjust the frame position manually. If you are sending to a professional printer, ask whether they need bleed, and add 3 mm of extra artwork on each side. Always request a proof before printing a large batch.
Mistake Three: Overlooking the Retro Aesthetic in the Wrong Context
The pixel retro frame is a design choice with a strong personality. It evokes nostalgia, arcade culture, and a playful kind of formality. That works wonderfully for gaming tournaments, coding bootcamps, creative workshops, or youth achievement awards. But if you are certifying a medical compliance course, a financial advisor exam, or a corporate board appointment, the same frame can send the wrong signal.
I have seen organizations use this template for serious professional credentials, and the mismatch between the playful border and the formal text undercuts the certificate’s authority. The recipient may feel the achievement is not being taken seriously, and external viewers may question the legitimacy of the certification.
Better approach: Keep the pixel retro frame for contexts where creativity, innovation, or informality is part of the brand. For more conservative corporate needs, switch to the Corporate Modern Certificate Template that often accompanies this product. That template typically uses clean lines, subtle geometric accents, and a restrained color palette. It still offers full customization but projects the professionalism expected in finance, healthcare, or legal settings.
Mistake Four: Skipping the Free Font Verification
The template says it uses only free fonts. That is a genuine benefit because it avoids the expense and licensing headaches of premium typefaces. However, free fonts vary widely in quality. Some lack certain glyphs, such as accented characters or proper apostrophes, which become obvious when you type a name like María or O’Brien. Others have poor hinting, meaning they look jagged when printed at small sizes.
I have seen completed certificates where the recipient’s name displays an ugly square or a mismatched fallback font because the original free font was not installed properly on the editing machine. The file may look perfect on the designer’s computer but fall apart when opened elsewhere.
Better approach: Download the specified free fonts directly from the original foundry or a trusted source like Google Fonts. Install them on every computer that will touch the file. If you are sharing the editable EPS with colleagues, either embed the fonts in the EPS or provide the font files alongside the template. Before finalizing the certificate, render a PDF with fonts embedded and check every character in the recipient’s name.
Mistake Five: Believing Customization Means Starting from Scratch
A common misunderstanding is that because the template is customizable, you should redesign large portions of it. I have watched users spend hours repositioning the pixel frame, changing the border thickness, or replacing the background pattern. By the end, they have something that barely resembles the original and often looks worse.
The real strength of the Pixel Retro Frame Certificate is that the layout is already balanced. The pixel grid creates a natural rhythm that guides the eye toward the center where the name and title sit. Changing the frame proportions or adding extra graphical elements disrupts that rhythm and makes the certificate feel cluttered.
Better approach: Customize the text, colors, and logo placement within the existing structure. Change the border color to match your brand, swap the placeholder logo with yours, and adjust the font size for longer names. Resist the urge to move the frame boundaries. If you need a completely different shape, you are better off starting with a blank canvas and building a new certificate from scratch rather than fighting the template’s intended design.
Mistake Six: Forgetting That a Certificate Is a Communication Tool
Technically perfect templates still fail if the information is poorly presented. I have seen certificates that cram the recipient name, course title, date, and signature into a small text block with no hierarchy. The pixel retro frame becomes a distraction instead of an enhancement because the viewer cannot quickly scan what the certificate actually certifies.
A certificate answers three questions: who earned it, what they earned, and when. The Pixel Retro Frame Certificate provides clear zones for each piece, but you must respect the hierarchy. The recipient name should be the most prominent text, followed by the description of the achievement, then the date and signatures.
Better approach: Fill in the template placeholders with real content and step back. Ask yourself whether someone standing three feet away can instantly read the recipient’s name. If not, increase the font size or adjust the spacing. Keep the description concise. Use the signature line to add authenticity, and include a small seal or logo to reinforce legitimacy. The frame does the decorative work, so your text only needs to be clear and well-spaced.
What to Check Before You Commit
Before you download or purchase the Pixel Retro Frame Certificate and Corporate Modern Certificate Template, run through a short checklist. Confirm that your editing software supports EPS files. Adobe Illustrator is the safest bet, but Affinity Designer and CorelDRAW also handle EPS well. If you only have access to web-based tools, verify that they can parse vector layers without flattening them.
Check the font list. The template page should specify which free fonts are used. Look them up, preview the glyph set, and ensure they support the characters you need, especially if your certificates include languages other than English.
Decide which template you actually need. If you anticipate awarding both creative and formal certificates, buy the bundle that includes both the Pixel Retro Frame Certificate and the Corporate Modern Certificate Template. That way you have the right tool for each situation without compromising on either side.
Finally, print a single test copy on your intended paper stock. Matte paper tends to make pixel borders look softer, while gloss paper sharpens the edges but may show reflections. Adjust the template colors or paper choice based on that test. One test print costs pennies. A ream of misprinted certificates costs time, money, and credibility.
Making the Template Work for You
The Pixel Retro Frame Certificate and Corporate Modern Certificate Template are not magic solutions. They are well-constructed starting points that remove the technical guesswork from certificate design. Your job is to bring the content, context, and quality control. Handle the editing in proper vector software, respect the print specifications, match the style to the occasion, verify the fonts, and keep the layout hierarchy clear. When you do those things, the template stops being a generic file and becomes a genuinely professional certificate that reflects well on both the issuer and the recipient.
The difference between a certificate that impresses and one that collects dust in a drawer often comes down to these details. Take the extra ten minutes to get them right, and your certificates will feel earned rather than manufactured.