Why Callista Powerpoint Template Deserves a Second Look Before You Buy
You have a presentation to build, and you want it to look polished, modern, and professional without spending hours learning design software. That is exactly the promise of the Callista Powerpoint Template. It markets itself as a minimal, ultra-modern solution for fashion entrepreneurs, product launches, and lookbook-style decks. And it delivers on much of that promise. But like any tool, the results you get depend on how you use it. Many people grab a template like this, drop in their content, and wonder why the final presentation still feels flat. The problem is rarely the template itself. It is almost always a handful of common mistakes that can easily be avoided once you know what to look for.
What Callista Powerpoint Template Actually Offers
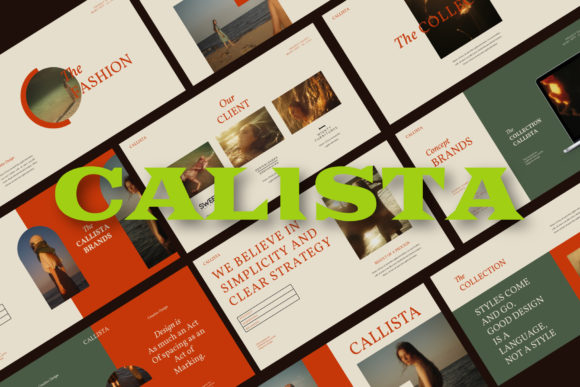
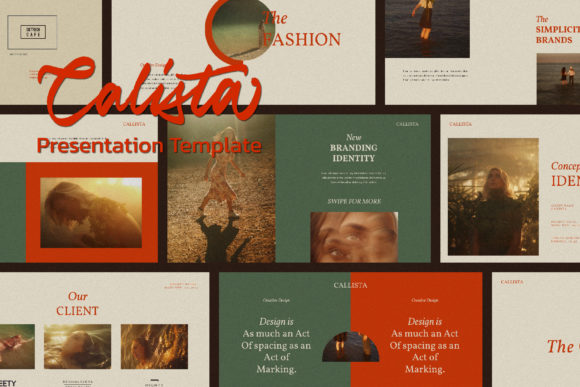
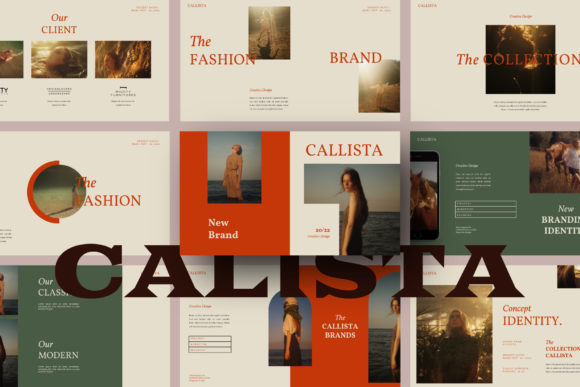
Before diving into the pitfalls, it helps to understand what you are working with. Callista is a PPTX file built at full HD resolution, 1920 by 1080 pixels. It uses unique theme colours that allow automatic colour changes across all slides, which saves an enormous amount of time when rebranding for a client or matching your own palette. The layout variations are substantial, with lookbook and magazine-style spreads that feel editorial rather than corporate. It relies on Slide Master technology, meaning you drag and drop your images into placeholders without shifting design elements by accident. Free fonts are linked in the help instruction PDF, and the package includes device mockups and an icon set.
This template suits anyone in fashion, beauty, lifestyle, or personal branding. It works for product catalogues, service pitches, portfolio reviews, and event marketing. But here is where people start to go wrong.
Mistake Number One: Treating It as a Fill-in-the-Blanks Solution
The most common error is assuming that a professional template does all the work for you. You swap the placeholder images with your own, change the text, and call it done. What you end up with is a deck that looks disconnected. The photos you choose may have different lighting, colour casts, or aspect ratios than the original samples. The template was built around carefully curated imagery, and your images may not align naturally with the layout.
How to avoid this: Before you insert a single photo, review your images as a set. Crop them to consistent aspect ratios. Adjust brightness and colour temperature so they feel cohesive. The Callista template gives you clean, airy space to work with, but your visuals need to match that tone. If your product photos are dark or busy, consider re-shooting or using the built-in mockup slides to isolate the product in a cleaner context.
Mistake Number Two: Ignoring the Theme Colour System
Callista includes an automatic colour change feature tied to its theme colours. Many users overlook this entirely. They manually change the colour of a shape or text box on one slide, then copy-paste that style to others. This creates inconsistency and doubles your editing time. When you later decide to shift the palette, you have to hunt through every slide to make the change again.
How to avoid this: Take five minutes to understand how PowerPoint theme colours work. Open the Slide Master view, locate the colour variants provided with the template, and choose the one that matches your brand. If you need a custom colour, modify the theme colours at the master level rather than individual slides. Every shape, text box, and accent element that was built with those theme colours will update instantly. This approach is faster and eliminates the visual drift that makes a presentation look amateurish.
Mistake Number Three: Overloading Slides with Text
The Callista design leans heavily on clean, visual storytelling. Its layouts feature generous white space, bold imagery, and short headlines. Yet many presenters try to cram paragraph-length descriptions into these slide designs. The result is cramped text that overflows placeholders, awkward line breaks, and a final deck that looks nothing like the elegant preview images that made you buy the template in the first place.
How to avoid this: Respect the layout. If a slide has room for a headline and three bullet points, keep to that. Move supporting details to speaker notes, a separate handout, or a following slide. The purpose of a lookbook-style template is to let visuals lead. Your audience will absorb more from a clean slide with one strong message than from a crowded slide that tries to say everything at once.
Mistake Number Four: Skipping the Free Font Installation
Every professionally designed template uses fonts that are not installed by default in PowerPoint. The Callista help PDF includes links to the free fonts used in the original design. Many people skip this step. They open the template, see that the font is missing, and let PowerPoint substitute an automatic replacement. The substitute is usually Arial or Calibri. Without the intended typeface, the entire aesthetic shifts from refined editorial to generic office document.
How to avoid this: Download and install the linked fonts before you start editing. It takes maybe two minutes. If you plan to share the file with someone who does not have those fonts installed, embed the fonts into the PowerPoint file. Go to File, Options, Save, and select Embed fonts in the file. This ensures the presentation looks exactly as designed on any machine.
Mistake Number Five: Using Low-Resolution Images
The template is built at full HD resolution. That means your images should be at least 1920 pixels wide to fill the slide without pixelation. People often pull photos from social media or free stock sites at smaller sizes and stretch them to fit. The result is soft, blurry visuals that undermine the crisp, modern look the template was designed to deliver.
How to avoid this: Source images at high resolution from the start. If you are using product photography, export your camera files at full size. For stock images, filter your search for large dimensions. When you drag an image into the template, use the built-in picture placeholders so the image is cropped rather than stretched. The template handles alignment for you, but the quality of your source material sets the ceiling for your results.
Mistake Number Six: Not Customizing Beyond the Default Layouts
Beginners often believe that using a template means accepting every slide exactly as provided. This leads to presentations that feel generic even with custom content. The Callista template includes a variety of layouts, but you are not limited to them. You can duplicate slides, reorder elements, hide unused placeholders, and combine pieces from different layouts to build a flow that matches your narrative.
How to avoid this: Treat the template as a starting point, not a cage. If your story needs a two-column product comparison that is not in the default set, create one by copying elements from existing slides. The Slide Master structure keeps the design consistent, so your custom slide will still carry the template's look and feel. The best presentations using Callista are the ones that bend the template to fit the content, not the other way around.
Mistake Number Seven: Forgetting about Device Mockups and Icons
The Callista package includes device mockups and an icon set. Many users overlook these assets entirely. They paste a screenshot of their website or app directly onto a plain slide, which looks flat and disconnected. The mockup slides are designed to frame screenshots in realistic phone or laptop bezels, making the content feel tangible and product-ready.
How to avoid this: Use the mockup slides for any digital product or website showcase. Place your screenshot inside the device frame. This small step lifts the perceived quality of your presentation significantly. Similarly, use the included icon set instead of pulling random icons from the web. Icons from different sources have different stroke weights and styles, and mixing them creates visual noise. The icon set in the package is designed to harmonise with the template's look.
Mistake Number Eight: Rushing the Final Export
After spending time editing slides, people often export directly to PDF or video without checking how the file behaves. Colour shifts, missing fonts, and misaligned elements appear in the exported version even when the PowerPoint file looks perfect. This is especially common when the recipient opens the file on a different operating system.
How to avoid this: If you are exporting to PDF, use the PowerPoint PDF export feature rather than printing to PDF. Check the PDF on another device before sending it out. If you are presenting live, run through the slideshow on the actual projector or monitor you will use. This catches colour calibration issues and font rendering problems before your audience sees them. A final quality check takes ten minutes and can save you from a presentation that feels slightly off.
What to Check Before You Buy
Before you purchase the Callista Powerpoint Template, confirm that your version of PowerPoint supports the features it uses. The template relies on Slide Master and theme colour functionality, which is fully supported in PowerPoint 2016 and later on both Windows and Mac. If you are using an older version or a free alternative like PowerPoint Online or Google Slides, some features may not transfer. The automatic colour change and device mockups depend on native PowerPoint features that third-party apps often strip down.
Also review the included layout types. Look through the preview images carefully. Count how many unique slide layouts are shown. The product page should give you a clear sense of whether the template includes the specific slide types you need for your project, such as product grids, feature callouts, team slides, or contact pages. If the previews lean heavily toward editorial spreads, confirm that you also see slides suited for data or process steps if those are part of your presentation.
Making the Most of Your Investment
The Callista Powerpoint Template is a solid choice for anyone who needs a professional, visually driven presentation without starting from scratch. The key is to approach it with the same care you would bring to a custom design. Choose your images deliberately, install the recommended fonts, use the theme colour system properly, and respect the breathing room that the layouts provide.
When you do these things, the template ceases to be a shortcut and becomes a foundation. Your content still drives the message, but the design supports it without competing for attention. The result is a presentation that feels intentional, polished, and worthy of the product or service you are showcasing. That is the difference between someone who simply uses a template and someone who actually gets results from it.