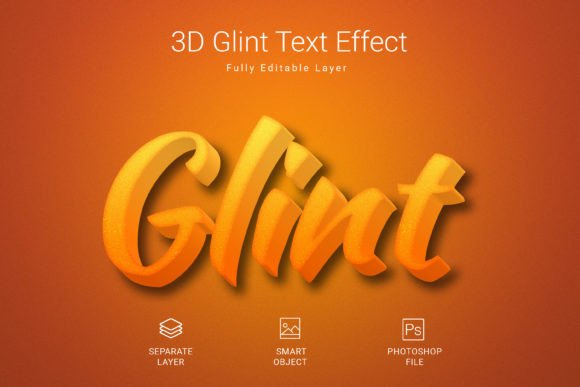
3D Glint Psd Text Style Effect Mockup: A Practical Guide to Getting the Most Out of Your Text Effects
When you are working on a design project, the difference between a professional-looking piece and something that falls flat often comes down to the details. Text effects are one of those details that can elevate your work significantly. The 3D Glint Psd Text Style Effect Mockup offers a fast, high-quality way to add depth and polish to your text, shapes, and logos. But getting the best results requires more than just downloading a file and clicking save. Let's walk through some common missteps and practical ways to make this tool work for you.
Why a Ready-Made Text Effect Can Save You Hours
Creating a 3D glint effect from scratch in Photoshop takes time, skill, and patience. You have to manage layer styles, gradients, lighting, and highlights, all while trying to keep the file size manageable and the resolution crisp. A well-made PSD mockup like this one gives you a shortcut that still looks custom. It provides a 3000×2000 pixel canvas at 300 DPI in RGB color mode, which is a professional-grade starting point. The smart object workflow means you drop in your text or shape, save, and the effect applies automatically. This is not a compromise on quality; it is a smarter use of your time.
However, many people download such a file and expect perfect results with zero adjustments. That misunderstanding is where most of the frustration begins.
1. Ignoring the Smart Object Instructions
The most frequent error is simply not understanding how smart objects work. A smart object is a container layer. You double-click its thumbnail, a new window opens, you paste or type your text there, save, and close. The effect then wraps around your content. If you try to edit the text directly on the main canvas, you will break the layer styles. The result is a flat, lifeless piece of text that does not have the 3D glint at all.
How to avoid this: Always read the instructions included in the PSD file or the product description. Look for the layer named something like "Your Text Here" or "Smart Object." Right-click and choose "Edit Contents" if you prefer, or simply double-click the layer thumbnail. Make your changes, then press Ctrl+S (Cmd+S on Mac) to save. Close the window, and your main canvas updates instantly.
2. Using Low-Resolution or Low-Contrast Text
Another common mistake is feeding the smart object with text that is too small, low resolution, or lacking contrast. The 3D glint effect relies on highlights and shadows to create depth. If your text is thin, very small, or similar in color to the background, the glint will not be visible. The effect will look muddy or disappear entirely.
How to avoid this: Use bold, thick fonts for best results. The free font that comes recommended with this mockup is typically a bold sans-serif or a slab serif, which catches light well. If you must use a thinner font, increase the font size significantly and consider adding a subtle stroke or shadow manually to help the effect stand out. Also, ensure your text color contrasts with the background you plan to use.
3. Overlooking the Canvas Size and Resolution
This PSD file comes at 3000×2000 pixels with 300 DPI. That is an excellent size for print, web banners, or social media graphics. But some users paste in tiny text that gets scaled up, causing pixelation. Others try to use the effect on a much larger canvas and wonder why the glint looks soft or stretched.
How to avoid this: Match your project canvas to the mockup's dimensions, or scale the mockup down after you have applied the effect. If you need a larger final output, create the text effect at the given size, then convert the result to a smart object again and scale it up. This preserves the quality of the glint and keeps your edges sharp.
4. Not Checking the Color Mode
RGB color mode is standard for screen use, but if you plan to print your design, you might need CMYK. Using an RGB file for print without conversion can lead to unexpected color shifts, especially with metallic and glint effects that rely on bright highlights.
How to avoid this: If your final output is print, convert the PSD to CMYK after you have finished editing, but before you flatten or save the final version. Do not convert while the smart object is still active, as this can distort the layer styles. Alternatively, keep a master copy in RGB and make a separate CMYK version for print. Check the glint colors after conversion and adjust if needed.
5. Forgetting to Save a Backup of the Original Mockup
This is a small but costly mistake. Once you start editing the smart object and saving, the original effect is overwritten. If you later want to start over with a different font or a different layout, you cannot simply revert.
How to avoid this: Always duplicate the PSD file before you begin. Keep the original untouched as a template. Work on the copy. That way, if you make a mistake or want to try a different approach, you have a clean starting point. This habit alone will save you from re-downloading the file multiple times.
What to Check Before You Buy or Download a Text Effect Mockup
Not all PSD mockups are created equal. Before you commit to using one, especially for a client project or a professional portfolio, take a moment to verify a few details.
- File quality and resolution: Look for at least 3000×2000 pixels and 300 DPI. Lower resolution files will look fine on screen but will fail in print.
- Color mode: RGB is standard for digital work. Make sure the file matches your intended use.
- Editable smart objects: Confirm that the effect uses smart objects rather than flattened layers. Flattened files cannot be edited.
- Free fonts: Check whether the recommended font is free or if you need to purchase it. This mockup uses a free font, which is a nice cost-saving feature.
- File format: Ensure you have the correct version of Photoshop to open the PSD. Most modern PSDs work with Photoshop CS5 and above, but it is worth verifying.
Practical Tips for Getting the Best Results
Once you have verified the file quality and avoided the common mistakes, here are a few extra steps to make your 3D glint effect look its best.
Experiment with Background Colors
The glint effect reacts differently to different backgrounds. A dark background makes highlights pop. A medium-toned background gives a more subtle, elegant look. A light background can wash out the effect. Try a few different background colors before finalizing your design. You can add a solid color layer behind your text and adjust it until the glint looks the way you want.
Combine Multiple Effects for a Unique Look
This mockup is a standalone effect, but you can layer additional styles on top if you are careful. For example, you can add a soft drop shadow behind the text for extra depth, or a subtle inner glow to enhance the glint. Just make sure you do these adjustments on a copy of the smart object, not inside the smart object itself, to avoid breaking the original effect.
Use the Effect on Shapes and Logos
One of the best features of this mockup is that it works on shapes and vector logos, not just text. If your logo is a vector shape, paste it into the smart object as a shape layer. The 3D glint will wrap around the curves and edges just like it does with text. This is a powerful way to create a branded graphic with a premium look.
Save Your Final Output Properly
When you are happy with the result, save a layered PSD master file for future edits. Then, for sharing or publishing, flatten a copy and save as PNG or JPEG. PNG is ideal for preserving the glint details if you need transparency. JPEG is fine for solid backgrounds but can introduce compression artifacts around highlights.
Why This Approach Matters for Your Work
Whether you are a freelancer working on a client's branding, a marketer creating social media assets, a small business owner designing your own flyers, or a hobbyist exploring new techniques, getting the details right makes a difference. A 3D glint effect used correctly communicates quality, attention to detail, and professionalism. Used poorly, it can look cheap or amateurish.
By taking a few extra minutes to understand how the mockup works, checking your resolution and color settings, and experimenting with backgrounds and fonts, you turn a simple download into a reliable tool that consistently delivers beautiful results. The 3D Glint Psd Text Style Effect Mockup is designed to make your work easier, not harder. When you use it correctly, you spend less time troubleshooting and more time creating.
If you found this guide helpful and the mockup lived up to your expectations, consider leaving a rating. Your feedback helps other designers make informed choices and encourages creators to keep producing high-quality resources.